After having driven the 911 a few times this year, I decided it was time to start my to-do list of little projects. Some things that have been bothering me are the shifting and the dirty state of the engine.
The shifting I've already determined to be caused in part by the shift coupler bushing which sits between the 2 back seats in the tunnel. It has discernible play in the linkage which cannot be helping the shifting.
So with the tunnel cover off I was able to remove the coupler and indeed I was able to jiggle the shaft in the bushings quite a bit.
I had ordered the bushing kit last year so now it's just a matter of pushing the pin out, removing the bushings, pressing in the new bushings and finally pressing in the pin.
Now the coupler is much tighter! Maybe too tight.. but I'm sure over time it'll loosen a little.
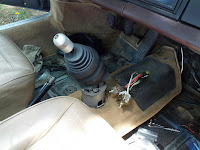
So, before connecting everything up in the back and adjusting the linkage, I also have the bushings in the front. There's the ball cup and the shaft bushing under the center console which take a little more work to get at than simply pulling the rug back and undoing 4 screws.
With the console off and the shift tower disconnected, I was able to see the front bushings are in good shape. I recall I changed the ball cup when I installed the short shift kit some 10 years ago, but other bushing I wasn't sure of.
After an hour getting everything undone, it's time to put everything back together.. hope I don't end up with spare parts :)
Now it's time to start the shifter adjustment. Being the first time I'm doing this procedure, I'm expecting the worst and hoping for the best. The procedure goes something like this:
1. With the shift coupler disconnected, put the transmission selector shaft in neutral and turn clockwise when facing the front of the car.
2. Move the shift lever to the left (towards the driver) and put the lower part of the lever vertical (90 degrees from level when viewed from the side of the car)
3. Tighten the shift connecting rod to the coupler.
4. Check that all the gears can be selected. Check for even distribution of travel in the shifter when selecting different gears. Ensure there is a little play in the selector shaft when in 5th.
With all that done I went for a drive. Things seemed okay but I didn't have the space to stretch the legs of all the gears. But, the travel of the shifter between 1st and 2nd isn't even, so I'll have to go back and fix that later.
But, before I ran out of time, I wanted to de-grease the engine and have a chance for it to sit in the sun and dry.
With newer cars, all of the electrical in the engine bay is weather resistant, but my car is neither new nor weather resistant. So out come the plastic bags to cover the air intake, distributor and fuse / relay panel.
Now for a liberal spraying of Gunk engine cleaner on 13 years of road grime and oil leaks.
While I'm letting this work it's magic, I'll take the time to properly glue in place the headlight seals that I hadn't done properly last fall.
That should be enough time soaking.. let's get out the old tooth brushes and start brushing. You'll forgive me for not having pictures of this process as I had dirt and grease and solvent on my hands and arms. But I did get some of the finished product.
That's all I had time (or energy) for today. I didn't get around to replacing the motor mounts. I guess it'll have to wait for Monday, which is a holiday :-)


No comments:
Post a Comment